
Implementation
Step 1: Generate online integration credentials
a. Sign in to your ShopBack for Business - Merchant Portal.
- If you have not created an account, refer to our guide here.
- Skip this step if you have already generated the integration credentials.
b. Once signed in, go to the "Settings" page from the User menu or click the link here directly Settings page for SG or Settings page for MY , and click 'Generate Credential'
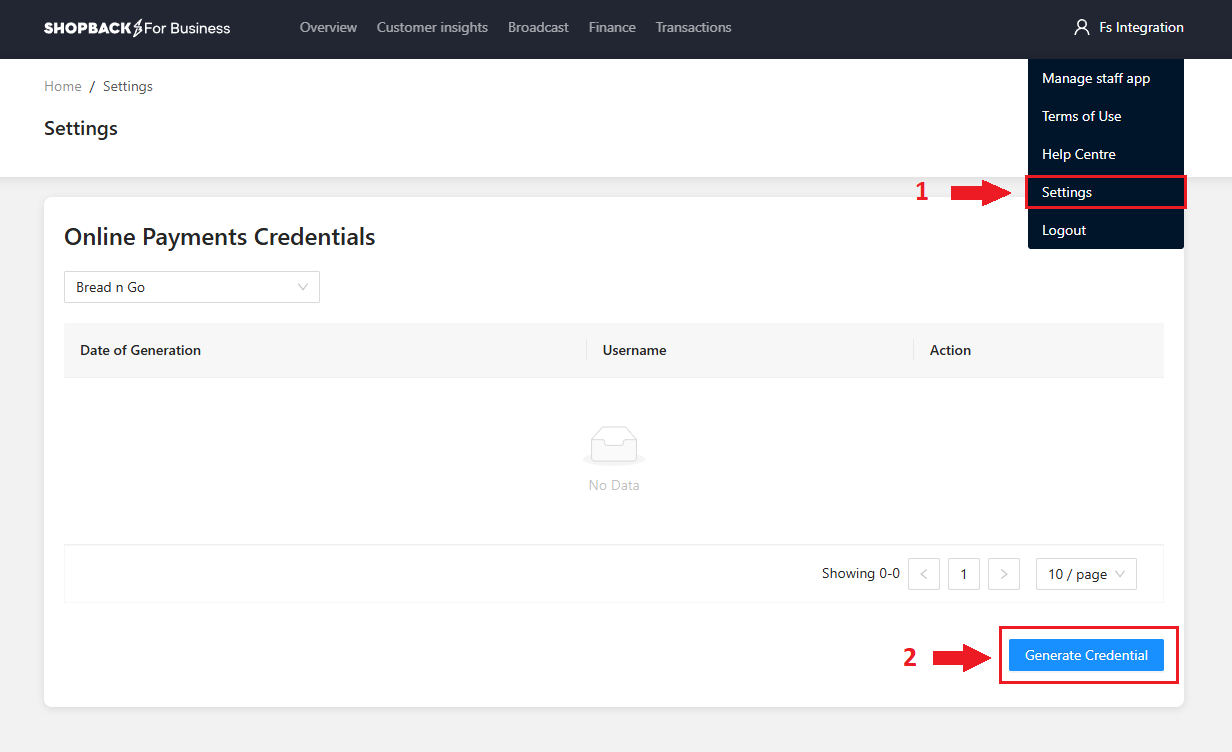
c. Once your credentials generated successfully, you may download the credentials for safe keeping. Please note, the Merchant Secret credentials can only be viewed once.
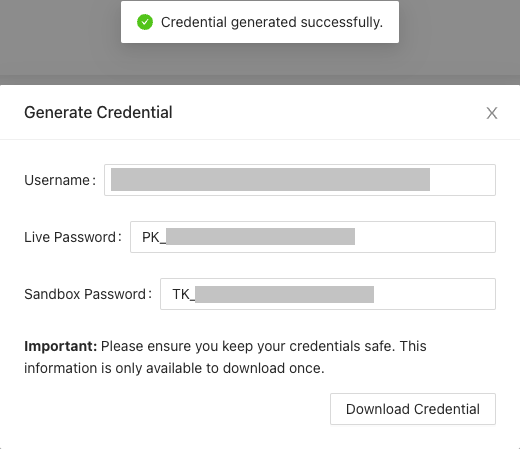
Username = {Merchant ID}
Live Password ={Production Merchant Secret}
Sandbox Password = {Sandbox Merchant Secret}
Step 2: Add ShopBack Pay as a payment option on your checkout
The following screenshot provides a best-practice example how the ShopBack Pay checkout could be designed. We suggest highlighting to customers that ShopBack Pay can be used with any debit / credit card.
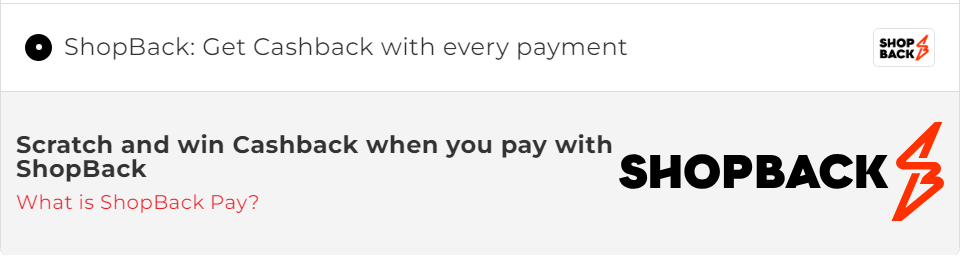
Main payment title: ShopBack: Get Cashback with every payment
Payment Logo: Click here to get our ShopBack Logo: Black Color Logo | White Color Logo

Secondary payment title: Scratch and win Cashback when you pay with ShopBack
Payment description:
| Country | Payment description |
|---|---|
| Singapore | What is ShopBack Pay? |
| Malaysia | What is ShopBack Pay? |
Step 3: API Payment Process Flow
1. Create an auth token: Create an authorization token using /auth/login API endpoint
2. Initiate an order: Initiate an order using our sample payload using /order/initiate API endpoint
3. Redirect the Consumer: Implement the ShopBack Pay checkout redirect flow to complete the payment
4. Implement Server-to-Server Payment Notification (Webhook): Implement the Server to server payment notification (payment notification webhook) to receive notification regarding the status of a payment
5. Check Payment Status: Check the payment status using /order/{orderUuid} API endpoint when we redirect the consumer back to your landing page
6. Display the outcome based on the payment status
-
Payment completed: Display your order confirmation
-
Payment not completed: Display a payment failure error message and present your cart / checkout
Important noteDo not – under any circumstances – integrate API calls directly from your frontend (e.g. via AJAX calls). This will create a serious vulnerability on your website.
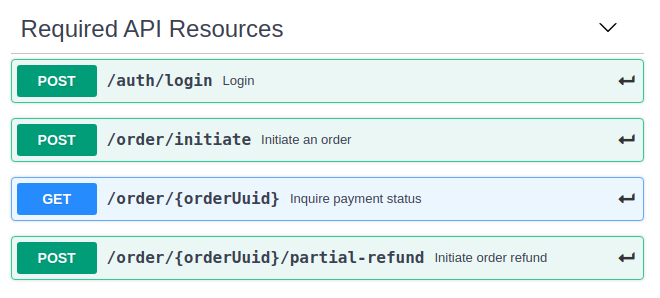
Step 4: Implement API resources for day-to-day operations, e.g. refunds
Once the order process works end-to-end, it is a good time to connect to additional API resources that will be needed in day-to-day operations:
- Required: Initiate partial order refund
- Optional: Update your order ID
Step 5: Handle Failed Orders in Checkout Flow
Make sure your checkout flow handles failed orders properly and allows customers to retry with a new order without creating duplicates or invalid transactions.
Create a new order for retries
- Always generate a new merchantOrderId / cartId for any subsequent order.
- Do not reuse the failed order ID.
The corresponding test scenario for this failed order behavior is listed in the spreadsheet under Checkout Flow Endpoint; Row 32. You can review it here: ShopBack Test Scenario Spreadsheet
Final Step: Verification
Ensure that your integration works correctly across all scenarios before going live. Refer to the Integration Verification page
Get to know our API
- Review our API documentation in detail – we have a grouped all required API resources into a section.
- Initiate orders via Postman or you may use any other API test tool to understand our API.
Updated 8 months ago