
Branch
Introduction
Branch is an app analytics tool. It requires the merchant to implement the SDK into the target app itself, both on iOS and Android. This requires some time and tech involvement and it is crucial for the tech team to do the correct implementation from the get-go so it is crucial that this is communicated to the merchant from the start.
Process Flow
- ShopBack user clicks on the ShopBack link which redirects to the Branch link with appended
shopback_id - Branch will determine if the user has the merchant app installed and redirect to the desired destination, i.e. the merchant app
- The user then lands on the merchant app and browses as per normal
- When the user completes a purchase, the purchase event is recorded and will signal to the Branch SDK and hence is recorded in Branch
- Branch then postbacks a webhook to ShopBack system
- A conversion is recorded by the ShopBack system and cashback is created
Setup Prerequisites
- Branch SDK to be installed in both merchant iOS and Android apps successfully.
- Relevant events to be captured by Branch SDK, for example:
- Custom purchase event
- Custom registration
- The events must capture the event parameters relevant to the commercial, e.g.
- Payment amount
- User
order_id - Item category
- Access to the Branch dashboard by either the Merchant Person-in-charge (PIC) or access granted to ShopBack
Branch Setup
Below here are the steps to set up on Branch using a step-by-step guide
To be given by ShopBack and inputted in Branch settings
Please request these data parameters from your ShopBack representative
Account Settings
| Parameter | Parameter Value | Compulsory? |
|---|---|---|
security_token | Provided by ShopBack | Yes |
Postback Config
| Event Name | Goal ID | Postback URL |
|---|---|---|
| Event 1 | Provided by ShopBack | Leave as is |
| Event 2 | Provided by ShopBack | Leave as is |
| Event 3 | Provided by ShopBack | Leave as is |
Info regarding postback
Example Postback
http://shopback.go2cloud.org/aff_goal?a=lsr&goal_id=${ (ad_network.goal_ids["INITIATE_PURCHASE"])! }&transaction_id=${ (last_attributed_touch_data.~click_id)! }&adv_sub=${ (custom_data.transaction_id)! }&amount=${ (custom_data.sale_amounts)! }&security_token=${ (ad_network.credentials.security_token)! }
Postback Definitions
Below are the frequently used macros. Please adjust the name to suit your needs
- Goal ID linked to Event name =
${ (ad_network.goal_ids["INITIATE_PURCHASE"])! } - Transaction_ids copied from URL =
${ (last_attributed_touch_data.~click_id)! } - Custom Event parameters with Custom Event name =
${ (custom_data.transaction_id)! } security_tokenfor ShopBack =${ (ad_network.credentials.security_token)! }
To be given by Merchant person-in-charge
In order for ShopBack to configure the postback, please fill in the custom event parameters captured by the respective event in the table below. This can also be provided by the supporting Branch manager or downloaded by the merchant under Custom Exports.
| Event Name | Custom Event Details (JSON Format) |
|---|---|
| PURCHASE (example) | json {"AMOUNT": "5000.00", "ORDER_ID": "5d0f09371e1be9000192382e", "ITEM": "iPhone X", "CATEGORY": "mobile phones"} |
| Event 1 | |
| Event 2 | |
| Event 3 |
The above Customer Event details will be used by ShopBack to map event parameters to the ShopBack backend system
Step-by-step Branch Dashboard Setup
This setup is required to be done by the Merchant inside the Branch dashboard. This can either be done by the Merchant’s team or by ShopBack by providing client access with the information down below.
Image 1
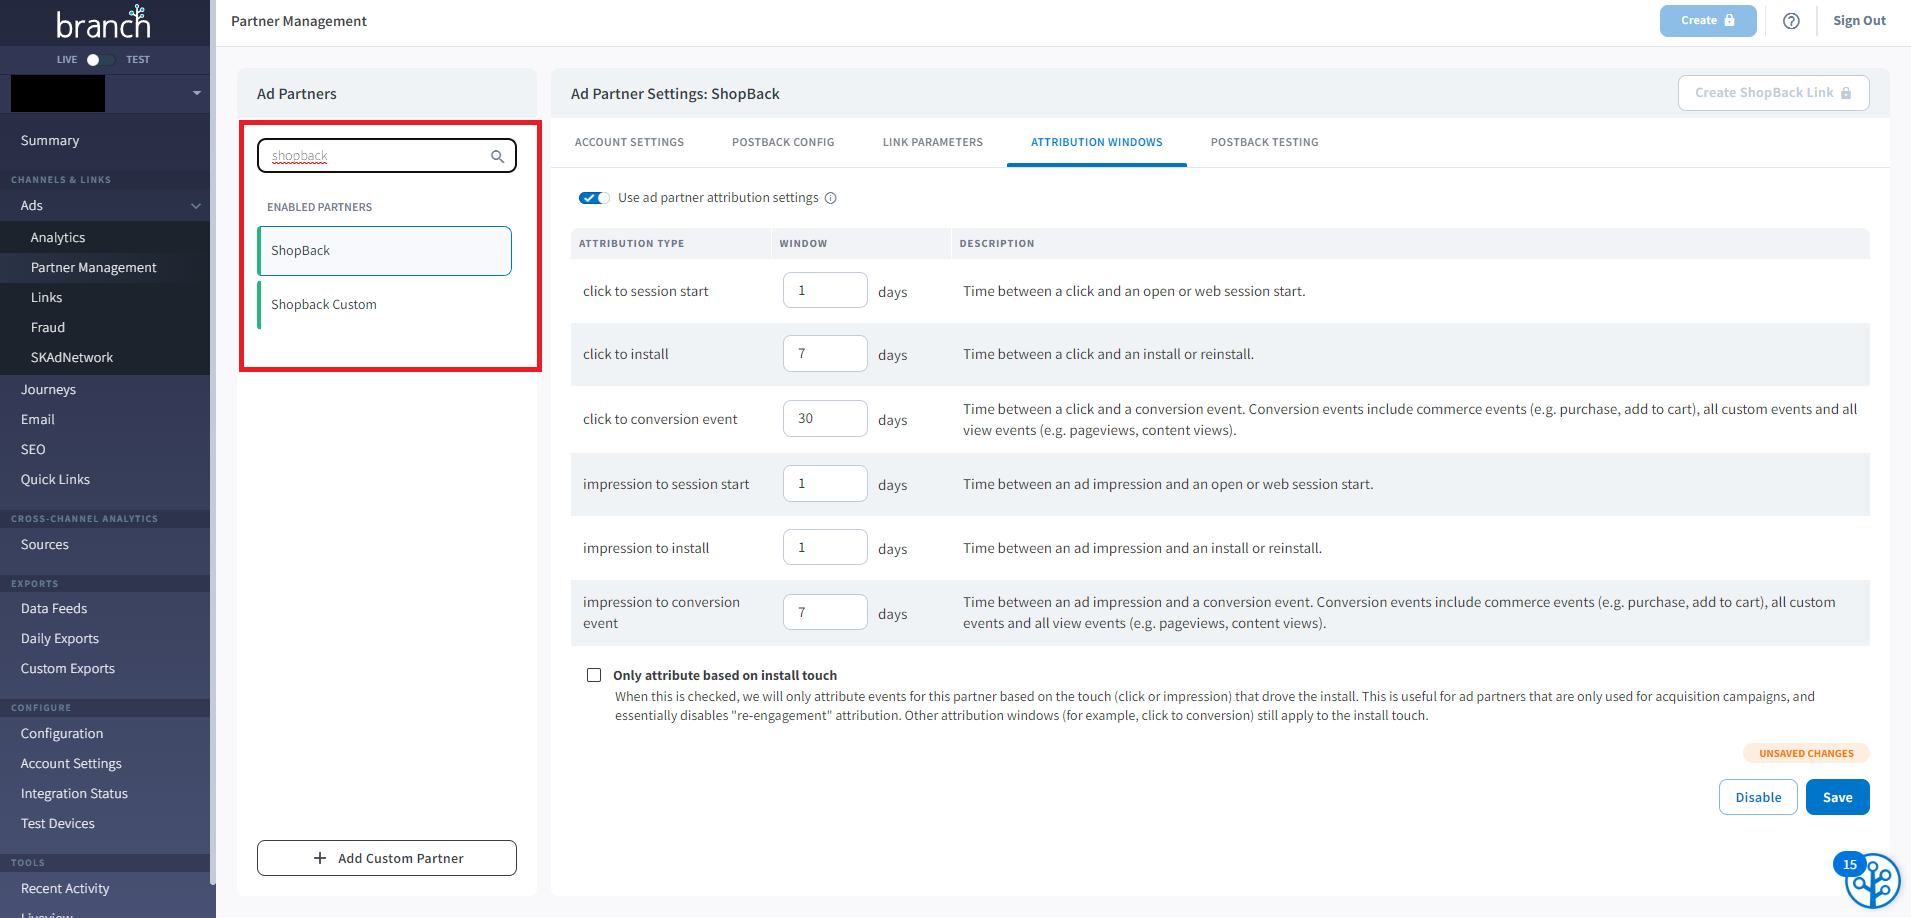
Step 1: Sign in to Branch and head to Partner Management and search for ShopBack under Partner Management settings under Ads
Image 2
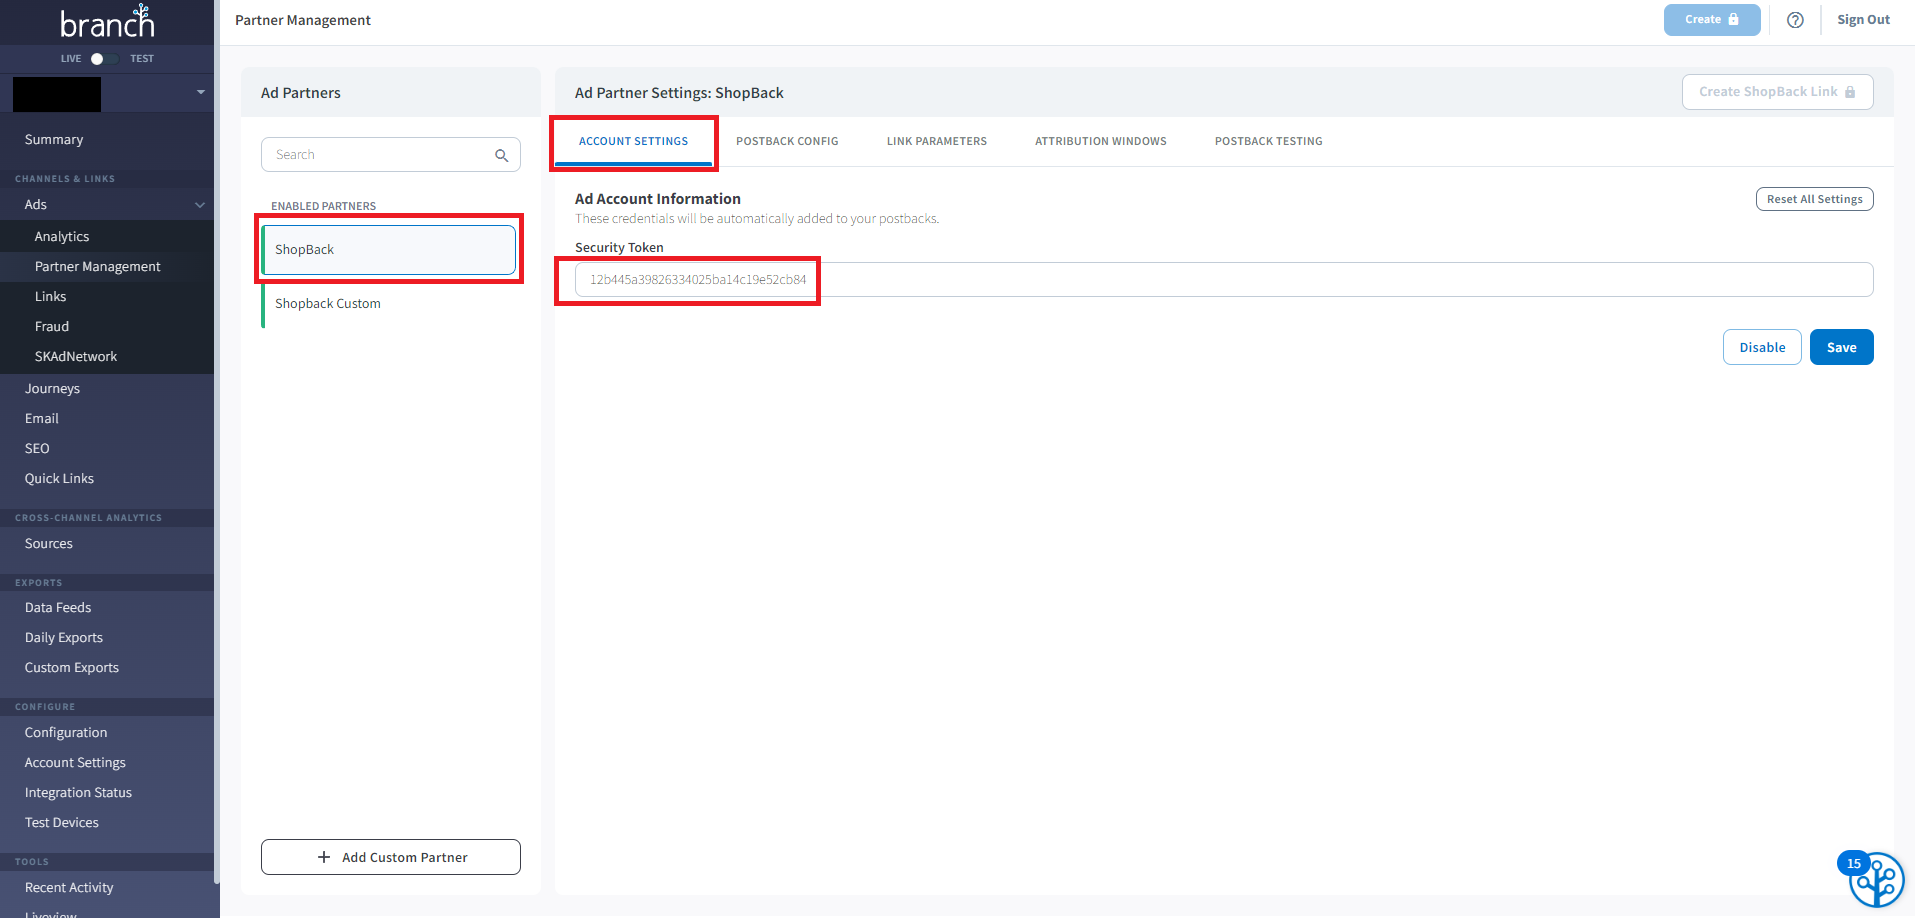
Step 2: Click ShopBack and you will be redirected to the various Partner settings page. Please fill in Security Token with the security token provided by ShopBack above
Image 3

Step 3: Moving on to Postback Config, select Enable for the relevant event and fill in the appropriate Goal ID provided above. Please fill in the appropriate Postback URL provided above
Image 4
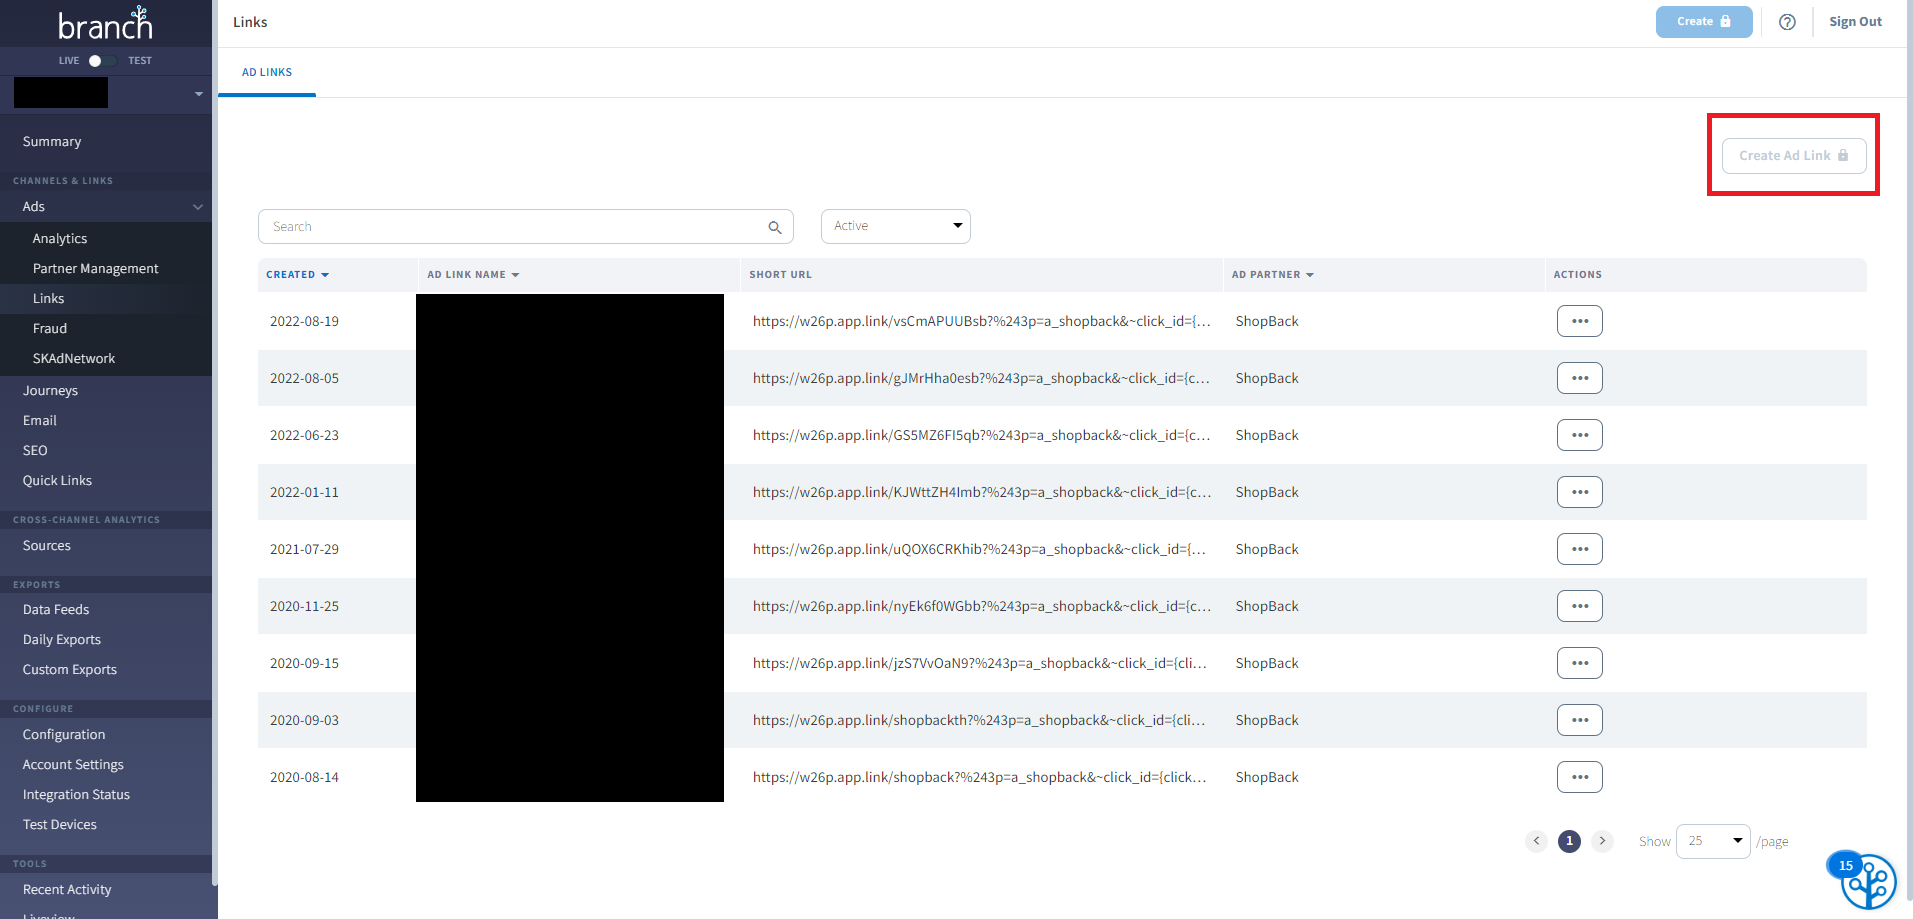
Step 4: Head into Links settings and click Create Ad Link
Step 5: Select App Install or Engagement
Step 6: Name your link appropriately and make sure Ad Partner selected is ShopBack. Then click “Create Link Now”
Step 7: And... you’re done!. Please copy the Ad Link to the ShopBack representative and testing can now be started.
Step 8: ShopBack will proceed to conduct test orders and once it is completed without any issues, the Merchant will be approved for launch.
Enable ShopBack client AccessTo enable ShopBack to more easily handle Branch dashboard setup. Please enable client ShopBack access with limited credentials. In order to do this. Please head to Account Settings and select Team on the tap navigation. Then, click “Add Agency Team Member” to provide ShopBack user with access.
Updated about 1 year ago